
Follow this Article
Click the Follow button on the upper right of this page, register your contact information (full name and email and become verified Help Center user. Follow Help Center categories such as Tech Notes, submit requests or questions. You can "unfollow" articles or categories at any time and the notices will stop.
Video walk-through: images & document attachments
Background:
For expenses, assets and logs, organizations often need to track and store expense receipts, photos documenting accidents or incidents and documents, forms or reports. Paper documents are either faxed to an office and filed, or they are scanned and emailed to an administrative office. Other times Excel or Word documents are emailed, or stored using VPN access to network file folders. All of these tasks are difficult to track. The documents are not easily tied to the crews associated with them, or the manager's creating them. Once stored, they are also very difficult to access for future reference.
Pacific Timesheet allows you to attach images and documents to expense, asset or log entries. For expense entries, one common application is attaching receipt images (e.g. a restaurant bill or gas receipt) or documents (e.g. a three-page hotel bill). In addition to expense entries and reports, Pacific Timesheet allows construction and field service organizations to attach photos to incidents log entries (e.g. photos of equipment damage or injury accidents at job sites). For audit purposes and compliance reasons, Pacific Timesheet will allow you to attached detailed log reports (e.g. accident or injury reports).
Pacific Crew's document and image attachments have a variety of applications.
How to use Pacific Crew Image and Document Attachments
Pacific Timesheet Module/Enterprise Licensing Requirements
Before you can use Expense, Asset or Log tracking in Pacific Crew or Pacific Timesheet's web browser crew timesheet:
- Your system must be licensed for any Expense, Asset or Log tracking modules which include image and document attachments, not just basic licenses which cover only Time tracking, or
- Your system must be licensed for the Enterprise version which currently has all Expense, Asset and Log tracking modules, and includes image and document attachments.
Pacific Crew's new image and document attachments allow you to include any image or document with a crew timesheet module, such as a Foreman Log, Incident Log, Safety Checks, as well as continued support for attaching receipt images to expense entries.
Key features
- Can attach detailed incident or accident reports, equipment damage, or material loss reports.
- Use the device camera to capture images.
- Leverage any mobile device image-handling features
- Store all common mobile image types from .jpg, .png, and .gif.
- Store most document types, including PDF, Text, Word, Powerpoint, .CSV and Excel files.
- Load and edit images and documents from device directories or other installed virtual directories (such as Dropbox, iCloud, Google Drive, or Microsoft OneDrive).
- Make attachments online or offline using your mobile device.
- Upload attachments you made offline when you have a signal.
- High-level data security to restrict access to images or documents.
Step-by-step Instructions for Different Use Cases
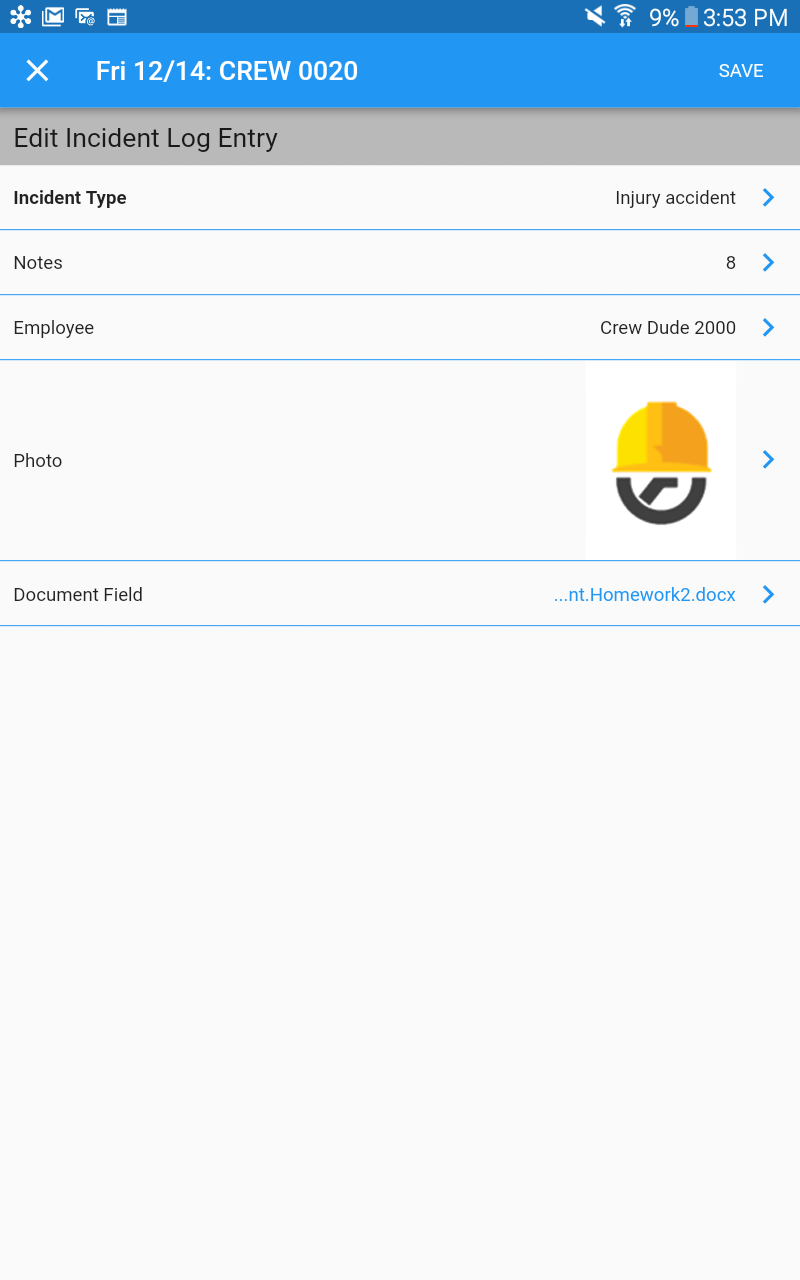
Adding an Image to a Log Entry
At a job site, for an Injury Accident, Equipment Damaged, or Materials Loss/ Damaged, you can take or attach an image from a device gallery to an Incident Log field to add more detailed information about the incident.
- Open the Pacific Crew app.
- Go the the Incident Logs tab.
- Select Add Entry from the bottom left.

- Choose the Incident Type (Injury Accident, Equipment Damaged, Materials Loss/ Damaged) by tapping the blue arrow.

- Next, tap the blue arrow in the Photo field to add a photo.
- Choose Image From Gallery or Take Photo.
- Once attached you can view the full photo by tapping the link in the Photo field.
- You can replace or remove the photo by re-selecting the blue arrow.
When taking a photo, you can leverage your device's image handling capabilities. Edit photos and add annotations such as circles, arrows, or text to highlight the most important aspects of the photo.
Adding a Document to a Log Entry
Using your mobile device's capabilities and Pacific Crew, on or offsite, you can fill out, save, attach a document to any module and upload it to the server. These might include your company's standard reports, such as an Injury Accident, Equipment Damage, or Materials Loss/ Damage report document. You can create and manage these company reports using the device's directories or other installed virtual directories and attach them to a Pacific Crew Incident Log entry field example below:
- Open the Pacific Crew app.
- Go to a Logs tab.
- Select Add Entry from the bottom left.
- Choose the Incident Type (Injury Accident, Equipment Damaged, Materials Loss/ Damaged) by tapping the blue arrow.
- Next, tap the blue arrow in the Document field to upload a document.
- You will be directed to your devices document directory.
- There you can select a range of document types, such as PDF, Text, Word, Powerpoint, or Excel files.
- Once attached you can view the document by clicking the link in the Document field.
- You can replace or remove the document by re-selecting the blue arrow and repeating the same steps.
Notes
- On Android devices, all documents in your device directories or virtual directories will be organized by document types.
- On Apple devices you will be directed to your device document directory. There you can select from documents on your device or from virtual directories.
Expense Entries
There are two ways to add employee expenses on the Expense module for Pacific Crew. You can add a "single employee" expense entry which has an attached expense receipt image. Or, you can add an "entire crew" expense entry which has an attached document, e.g. a crew receipts document, that contains multiple receipt images. Below, we will describe the Single Employee and Entire Crew use cases for attaching expense receipts.
Adding an Image to a Single Employee Expense Entry
If you want to make Single Employee entries on your crew, be sure to enable an important feature called "Blank Rows," which automatically creates a blank expense entry row for each crew employee. You can enable this feature under Crew Timesheet Options:
Templates >> Tablet 1 Setup >> Crew Timesheet Options >> Blank Rows >> Expenses
Once enabled, the system will automatically create a blank row for each crew employee on the Expenses tab.
From there, you can create Single Employee expense entries on the Expenses tab as follows:
- Open the Pacific Crew app.
- Go the the Expenses tab.
- Select Add Entry from the bottom left.
- Choose the Expense Typee.g. parking, taxi, meal, etc.
- Next, tap the blue arrow in the Photo field to add a photo.
- Choose Image From Gallery or Take Photo.
- Once attached you can view the full photo by tapping the link in the Photo field.
- You can replace or remove the photo by re-selecting the blue arrow.
When taking a photo, you can leverage your device's image handling capabilities. Edit photos and add annotations such as circles, arrows, or text to highlight the most important aspects of the photo.
Adding a Document to an Entire Crew Expense Entry
Sometimes it's more efficient to create an expense receipt document or image of crew members' expenses. These might be expense receipts for parking. The foreman can create a document with all employee receipts for parking that day, and then attach that document to a single expense entry with the appropriate quantities and description. Below are steps for creating an entry for crew member parking expenses and receipts.
- Open the Pacific Crew app.
- Go to a Expenses tab.
- Select Add Entry from the bottom left.
- To set the expense type tap the blue arrow and select Parking.
- Create a document that contains images of all crew member parking receipts and save the document in a folder on your device.
- Next, tap the blue arrow in the Document field to upload a document.
- You will be directed to your device document directory folder options.
- Select the file and attach.
- Once attached you can view the document by tapping the link in the Document field.
- You can replace or remove the document by re-selecting the blue arrow and repeating the same steps.
It might be more efficient to take a photo of a crew expense receipt sheet and attach that to an Entire Crew expense entry as an image.
Notes
- On Android devices, all documents in your device directories or virtual directories will be organized by document types.
- On Apple devices you will be directed to your device document directory. There you can select from documents on your device or from virtual directories.
Data Security
High-level data security is available for images or documents uploaded to timesheets. A Pacific Timesheet system administrator can edit the Security settings on your Pacific Timesheet cloud server system as follows:
- Login to your Pacific Timesheet cloud server system.
- Go to the System tab.
- Go to the System>Security (which is System sub-tab)

- On lower part of Security page, you can select and edit various Permission levels such as Employee, Timekeeper, Client, Foreman, Supervisor, Superintendent, Project Manager.
- Select the security permission you would like to modify.
- Then click the Edit button
 to begin editing.
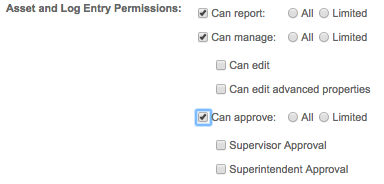
Asset and Log Entry Permissions
- Navigate down the page to Asset and Log Entry Permissions
- Check the boxes Can Report, Can Manage, or Can Approve to enable what users can do.
- You have the option of selecting All or Limited for both.
- If you have selected Can Manage:
You can give permissions of Can Edit or Can Edit Advanced Properties to users. - If you have selected Can Approve:
You can allow for Supervisor or Superintendent Approval.
Asset and Log Field Level Permissions
- Login to your Pacific Timesheet cloud server system.
- Go to the Assets and Logs tab.
- Click the blue arrow on the far right of the module.
- A dropdown menu will appear.
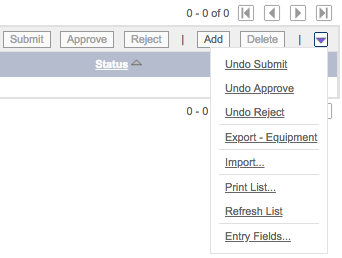
- From there, select Entry Fields and you will be directed to the module where you can edit Entry Field permissions.
- In the left corner you can select to edit, from a dropdown menu, which Entry Fields of: Safety Checks, Expense, Incident Log, Materials, Foreman Log, Timesheet Image, or Wall.

- Click the Edit button to begin editing.
- You can then change the Access of each Field from Editable, Hidden, or Read Only.

- In the Access Exception column check the boxes to give Permission Levels with Special Access by clicking the underlined text.
- Special Access can be changed to Editable, Hidden, or Read Only for Employees, Timekeepers, Clients, Foreman Restrict Tests, Foreman, Supervisors, Superintendents, Project Managers, or Administrators.
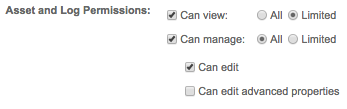
Asset and Log Permissions
- Change which group Can View or which group Can Manage to allow for different access permissions.
- You have the option of selecting All or Limited for both.
- If you select Can Manage:
You can select which group Can Edit or which group Can Edit Advanced Properties.
Uploading Attached Images and Documents
- Once you have submitted a Crew Timesheet, all images and documents will be uploaded to the cloud system. Once uploaded, managers can review all crew timesheet entries, view their attached images, and open and review their attached documents.
- If managers unsubmit and modify your crew timesheet image and/or document attachments (e.g. modify the content of an attached document), you can use Download Sheets to re-sync your Pacific Crew app with these changes made on the cloud server.
NEXT STEPS:
Pacific Timesheet's image, document attachment and upload features have many applications for licensed expense, asset or log modules. Most important, they allow you to eliminate emailing and faxing images and documents. These features also provide easy-to-access centralized storage for critical documents, receipts and images.
If you are an existing customer and would like to enable these features, contact your customer relationship manager or email sales@pacifictimesheet.com. If you are not already a customer and would like to evaluate image and document attachments for Pacific Crew or Pacific Timesheet Crew Timesheet solutions, email sales@pacifictimesheet.com or request a free trial.
Download & install Pacific Crew apps
You will need to first begin a free trial so your Pacific Crew app can connect with an enterprise system in the cloud. Then, you can download and install the Pacific Crew app. If you are already a Pacific Timesheet user, you can install Pacific Crew and connect with your cloud server.
Use the Pacific Crew tutorial and learn how to connect your cloud server.
Or, you can use the Pacific Crew Video tutorial to learn how to use Pacific Crew.
![]()
![]()
Pacific Timesheet Announces New Features, Pacific Timesheet, Pacific Crew
Comments
0 comments
Please sign in to leave a comment.